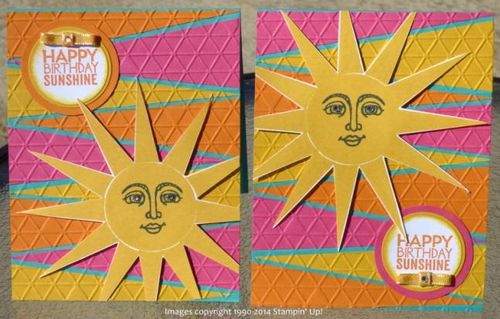
Ray of Sunshine Project Sheet
Supplies:
- Stamp Sets: Ray of Sunshine w#134339 c#134210
- Card Stock: Bermuda Bay #131197, Melon Mambo #115320, Pumpkin Pie #105117, Crushed Curry #131199, Whisper White #100730
- Stamp Pads: Tuxedo Black Memento Pad #132708, Crushed Curry #131173, Pumpkin Pie #126945
- Miscellaneous: Big Shot #113439, Circles Collection Framelits #130911, Tiny Triangles Textured Impressions Embossing Folder #133740, 1-3/8” Circle Punch #119860, 1-3/4 Circle Punch #119850, 1/8” Crushed Curry Taffeta Ribbon, Rhinestone Basic Jewels #119246, Paper Snips #103578, Stampin’ Trimmer #126889, Stamp-a-ma-jig {SAMJ} #101049, Stampin’ Sponges #101610, Stampin’ Dimensionals #104430, Multipurpose Liquid Glue #110755
Measurements:
- Bermuda Bay (card base): 4 ¼” x 11” – score card in half to create card 4 ¼” x 5 ½”
- Width of all horizontal triangles: 4 ¼”
Instructions:
- Stamp center of sun onto white card stock with Crushed Curry ink.
- Using SAMJ, stamp sun’s rays.
- Stamp sun face using SAMJ and black ink
- Using Paper Snips, carefully cut sun out.
- Stamp sentiment onto white card stock with Pumpkin Pie ink. Punch with 1-3/8” circle punch. Sponge Crushed Curry on edges of punched sentiment. Adhere to Crushed Curry card stock. Die cut with Circles Collection die. Adhere to Melon Mambo or Pumpkin Pie (image has both samples). Punch with 1-3/4” circle punch.
- Using 4 ¼” wide strips of Melon Mambo, Crushed Curry and Pumpkin Pie card stock, angle on trimmer and cut out varying sizes of triangles.
- Arrange triangles on Bermuda Bay card base with a little (1/8”-ish) Bermuda peeking out. Adhere. Cut off excess on bottom if a triangle it too big for that area.
- Using the Tiny Triangles embossing folder, run card through Big Shot embossing what will be the card front.
- Using Multipurpose glue, adhere sentiment to card front.
- Using Dimensionals, adhere sun to card front – the rays will be wider than the card – don’t worry – you will cut them off after adhering.
- Cut of excess rays that are wider/taller than card.
- Make a tiny bow with the ribbon – adhere to card
- Use 2 rhinestones for the eyes and one on top of the ribbon.
- Now, go mail it to someone!
Hint: There are 3 different triangles on this card = the sun rays, the horizontal background and the embossing folder. Ties it all together.

